Designing patterns for your Christmas lights
There’s still time to squeeze in a festive make before the big day, and luckily for you, the latest issue of Raspberry Pi Official Magazine is stuffed full of them. In this tutorial, Ben Everard explains how to balance brightness, colour, and movement to achieve the perfect pattern for your Christmas lights.
In last month’s issue of Raspberry Pi Official Magazine, we looked at different forms of WS2812B LEDs (also known as NeoPixels) that you can use to make Christmas lights. Now, let’s take a look at how to customise them. We’re not going to dwell on the software too much — there are libraries available for just about every language you’re going to come across, and you can control them on a Raspberry Pi, a Raspberry Pi Pico, or most other platforms that you can physically access a GPIO on (we’ll use CircuitPython on Pico, but you could translate it into another language or platform fairly easily). Instead, we’re going to think about what we want them to do. In other words, rather than looking too much at how to make them work, we’re going to focus on how to make them look good.
Balancing act
In our experience, getting a good-looking light pattern is about creating balance across three different things:
Movement: There’s a common joke in the maker community that things need more blinking lights. However, harsh on-and-off blinks can be really garish, distracting, and rarely look good. Instead, we usually want our movement to be more fluid. There is a balance to strike between fluidity of movement and speed.
Colour: You can create almost any colour with WS2812B LEDs. However, that doesn’t mean you can just mash every colour together and end up with something that looks good. A well-thought-out colour palette is probably the single most important part of creating a good-looking Christmas light display.
Brightness: WS2812B LEDs often come in large blocks — strings of hundreds of them. Each one may not be that bright, but lots of them together quickly get very vivid. Just because you have all the LEDs doesn’t mean that they all have to be on at the same time. Black is one of the most powerful colours in an LED pattern. You can move patches of colour around, or simply create a pattern that users can look at without hurting their eyes.
Colourify
First, let’s take a look at colour. Obviously, the most classic Christmas combination is red and green — and it’s a classic for a reason. Colours are complementary if, when you combine them, you get grey. They contrast strongly with each other, but in a way that feels balanced.
Colour theory is often shown using a colour wheel that has all the hues around the outside. Complementary colours are opposites. The hue is often given as the number of degrees around the outside of the colour wheel that you have to travel.
You can continue the basic principle of building a palette out of colours that combine to make grey with more colours. With three colours, you’re looking for hues that are 120 and 240 degrees apart. You can continue to work upwards with more colours, ensuring they are evenly spaced around the wheel.
However, the distance around the outside of the colour wheel only defines the hue, and this is only one part of colour. For example, you won’t find pink on the outside of the colour wheel because pink is the same hue as red, but with less saturation. Saturation defines how ‘pure’ a colour is. You reduce saturation by mixing in white. If we’re defining our palette by hues spaced around the colour wheel, we usually want to make sure they all have the same saturation.
There is also a slightly unusual take on this that can work: an infinite-range colour palette. If you pick hues at random, but always have the same saturation, you can make a balanced palette. This works best at lower saturations; otherwise, it can get a bit too garish.
You don’t have to balance your colours like this. Another option is to use a string of colours that are close to each other on the colour wheel. This is known as an analogous palette.
There are many ways to build a palette that you can use, and we’ve only looked at a few here. These are the ones we like to use, but that’s partly down to personal preference. We should end this by saying that there is no perfect theory of colour (despite there being many things called a theory of colour). There are lots of ideas — like the ones we’ve given above — many of which have a track record of looking great. However, these are just things that people have found tend to look good. If you prefer something that doesn’t fit into anyone else’s theory of colour, then it doesn’t matter. They’re your lights, and what you like matters more than what some theory says.
Perhaps the key thing we’d like you to take away from this is that there are methods for building palettes to create different effects in the pattern, and if you build your pattern with a changeable palette, it lets you experiment and find one that works for you.
Theory into practice
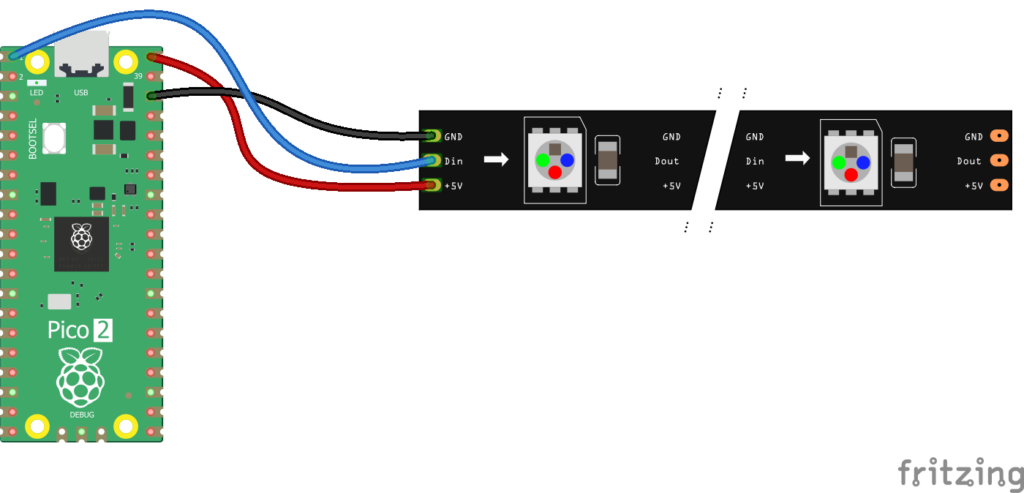
Let’s now take a look at all of this in action. Last month, we looked at a range of options for connecting LEDs to Pico, so we won’t go into too much detail here. We’ve connected our string to GPIO 0, but that’s easy to change if you want to connect yours in a different way.
We’ve written our code in CircuitPython, so you’ll need to install that. You’ll also need the ‘neopixel’ and ‘adafruit_fancyled’ modules, both of which are in the CircuitPython Library Bundle. You can get all of this from circuitpython.org. You’ll also need a computer with the Mu code editor installed, which you can download from codewith.mu. If you’ve not used CircuitPython before, we’d recommend having a quick look at the beginner’s guide so you know how it all works.
We’ve devised a test pattern that lets you play with all of these variables to see how they affect the pattern — see the ‘test_pattern.py’ code listing. Once you’ve figured out your preferences for the balance of movement, colour, and brightness, you’ll be in a great place to design your own pattern.

This will build a palette in two different ways: either a balanced palette (evenly spaced around the colour wheel) or an analogous one (clustered around one point). These aren’t the only ways to build a palette, though; you could write your own function to build a palette, or create one by hand and paste in the values. Either way, you can select the number of colours, the root colour, and (in the case of analogous) the variance (i.e. the distance between adjacent colours in your palette).
You can also adjust the movement in the pattern in two ways: by changing the number of steps (i.e. the number of brightness shades between fully off and fully on), or by altering the sleep time. Increase one or both numbers for slower, smoother animations, or decrease them for faster, more blinky animations. There is also the ‘new_colour_prob’ variable, which changes both the movement and the brightness. In each loop, it picks a pixel at random and either lights it in a new colour or turns it off. Increasing this number increases the chances of the pixel going black. A higher number means a darker pattern — but within that darker pattern, there’s more scope for movement.
Exploring the various options for this pattern should give you an idea of the sorts of things you like to see, which will put you in a really good place to build your own.
Download the full code: rpimag.co/github
Raspberry Pi Official Magazine #160 out NOW!
You can grab this issue from Tesco, Sainsbury’s, Asda, WHSmith, and other newsagents, including the Raspberry Pi Store in Cambridge. It’s also available from our online store, which ships around the world. And you can get a digital version via our app on Android or iOS.
You can also subscribe to the print version of our magazine. Not only do we deliver worldwide, but people who sign up to the six- or twelve-month print subscription get a FREE Raspberry Pi Pico 2 W!
The post Designing patterns for your Christmas lights appeared first on Raspberry Pi.
from News - Raspberry Pi https://ift.tt/ezdWrHD
Labels: News - Raspberry Pi, IFTTT

0 Comments:
Post a Comment
Subscribe to Post Comments [Atom]
<< Home