In the brand new issue of Raspberry Pi Official Magazine, David Crookes takes a look at this uplifting replication of an elevator system.
Life can be full of ups and downs — and for maker Alan Boris, that can be something to celebrate. After all, he’s a self-proclaimed lover of elevators, having grown to appreciate just how complex these vertical transportation devices actually are. And, when he rode a “very cool” one recently, his tech ambitions rose to another level.

“When you start to think about the design, elevators have a lot of inputs and outputs: buttons, sensors, motors, LEDs, and floor indicators,” he notes. “They may be simple to use, but they hide a lot of complexity behind the scenes — so I created one using Raspberry Pi devices because it seemed like a great programming challenge.”
Now, it has to be pointed out that Alan didn’t crack on with the task of building a real, working elevator for his home. That would be a disruptive endeavour costing many thousands, which is why he decided to produce a much smaller replica instead. To do this, he made use of a Raspberry Pi 4 Model B computer and some Raspberry Pi Pico 2 W microcontrollers. He also created an impressive hydraulic system. “And it was all a lot less expensive than the real thing,” he tells us.
Uplifting concept
The project also scratched an itch. “I was looking to do a project where the Raspberry Pi single-board computer and the Raspberry Pi Pico microcontroller communicated and worked together,” he explains. To that end, he decided he would make an elevator car operating panel and wirelessly connect it to some hall stations, and began to create about half a dozen diagrams on paper to guide him. He wanted it to be possible to call the elevator by pressing either an up or down button on a station — the idea being that there would be one on each of three floors. He would then have the car’s interior panel’s display react in some way when one of its own buttons was pressed.

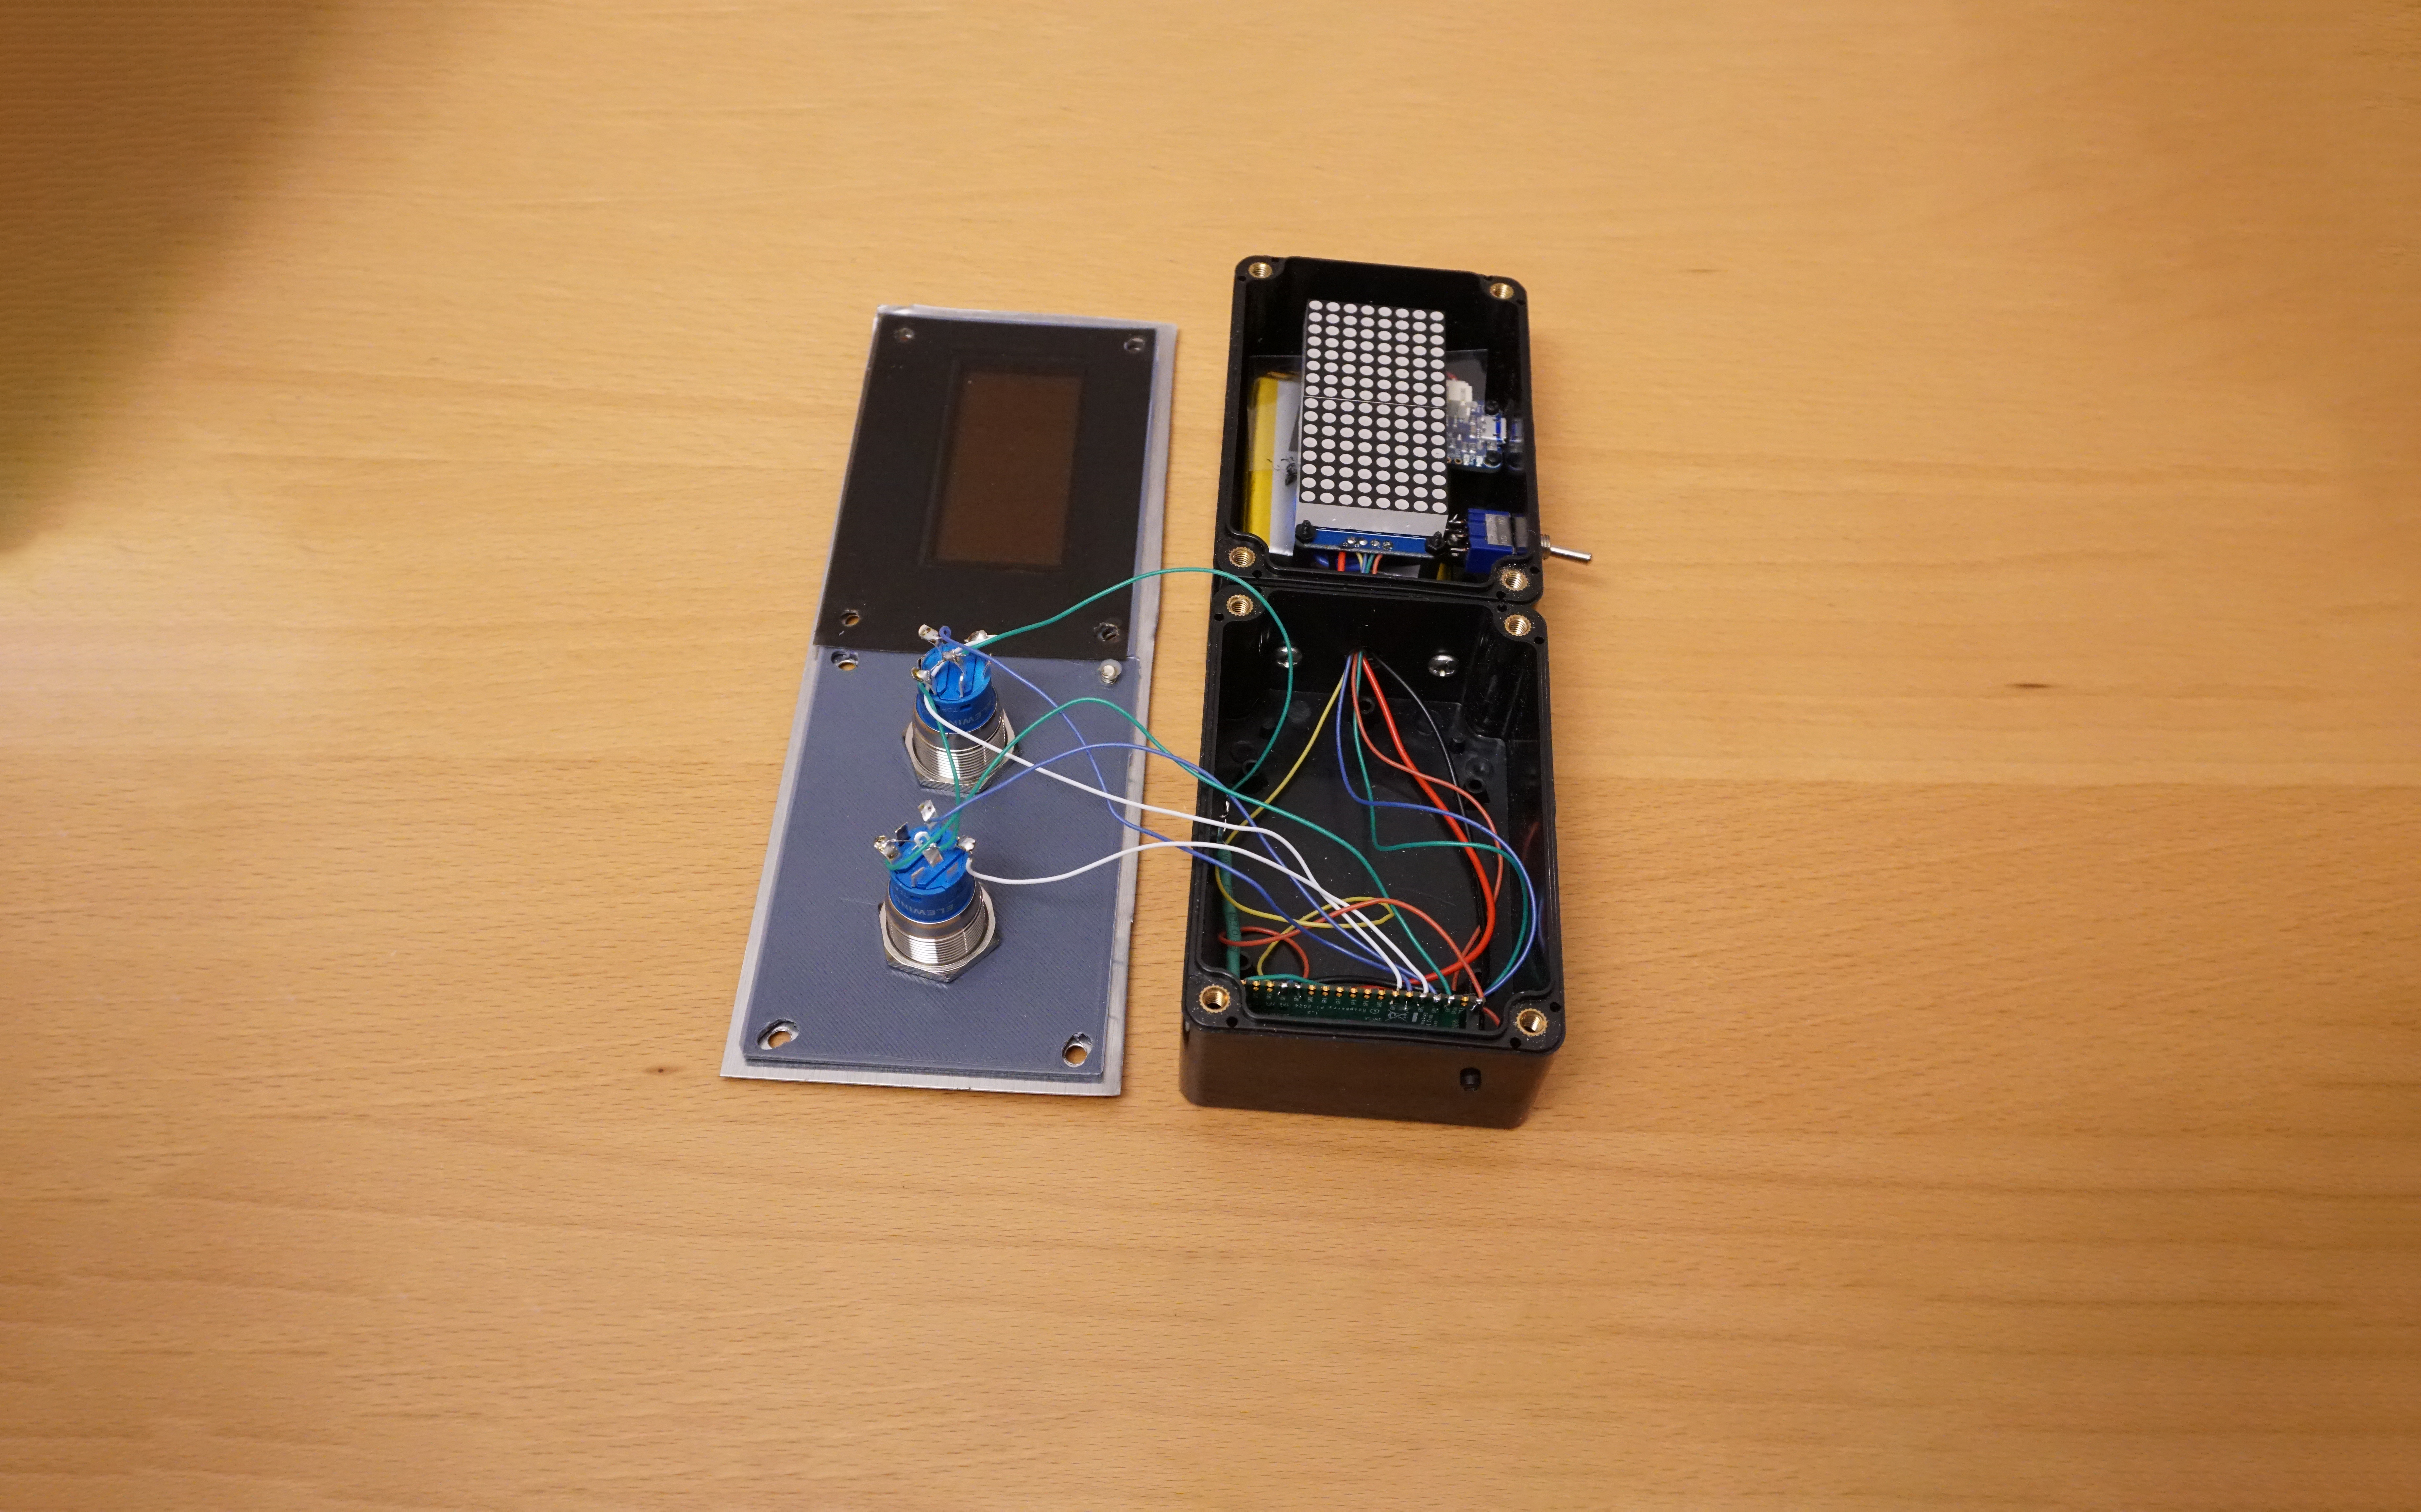
“I wanted the [interior car] panel to be similar to an interesting elevator I was in a few months ago, so I knew it would have an LCD display and buttons that had built-in LEDs,” he says. “The elevator also had spoken messages such as ‘watch your step’, so I knew I wanted to add a DAC and amplifier board to the Raspberry Pi 4 Model B computer to support that. In addition to the messages, the elevator’s panel beeped as each floor was passed, and there were dings for the up and down direction notifications. People often don’t notice that most elevators ding once for up and twice for down when they arrive on a floor, and I wanted all of that in my build.”
The hall station panel only needed two buttons for up and down, but Alan needed a way to show which floor the elevator car was on and the direction it was travelling in. “I searched for a suitable LED matrix display,” he says, “and the buttons were inspired by a different elevator system, so you could say my setup was beginning to be an amalgam of elevator controls I’ve admired over the years.”
Pushing his buttons
Selecting the parts was a challenge. Alan had to ensure the components, such as the display and the LED matrix, had software libraries that he could easily use, and there was a lot of improvisation as he realised the panel would be full of parts that needed to clear each other. “Substituting a part or moving it slightly could affect other part placements,” he reveals. “For instance, the push buttons are very deep, almost the full depth of the case, so very little, if anything, could be placed behind them.” This meant that finding cases that were the correct size was tricky. “I initially considered 3D printing the entire case, but that would have taken too much time. I could not find a long, rectangular project case in stock for the floor call button assembly, so I ended up bolting two shorter ones together.”

To make the panels look more like the ones in real elevators, he decided to use sheet metal and stick the button labels on (he printed them white-on-black with a laser printer and stuck them on using double-sided tape). Alan had never worked with sheet metal before, but found it was in stock at a local hardware store. He picked up 0.019-inch (0.5 mm) thick sheets that could be cut with simple shears.
“My interior rectangular cutouts for the display were terrible — very uneven with shards of metal sticking out. I filed them down and hid my poor cuts with a simple 3D-printed frame that snapped onto the cut-out sections.”
On the rise
Since Alan had once seen a hydraulic elevator being repaired, he decided this was the system he’d use. “I created a mock-up showing how they work, but this required me to design a board that could allow Raspberry Pi Pico 2 W’s GPIO header to switch high voltages,” he explains. “But it allowed me to work with a relay board, which was a lot of fun. I like how the tiny Pico can control huge pumps and solenoids.”

With no experience of hydraulics or plumbing, this was a learning curve. “I had to educate myself on the various couplings and fittings to fit the PVC pipes and hoses,” Alan adds. Everything was then brought together using a program written in Python. “It basically waits for button presses via Raspberry Pi 4’s GPIO pins and then takes appropriate action.”
Coding the project was another challenge. “It was soon full of ‘if-then-else’ spaghetti code,” he recalls. He then stumbled upon the elevator algorithm. “It basically states to keep moving in one direction and fulfil all floor requests, then start moving in the opposite direction to serve any remaining requests. I crudely implemented this algorithm using a Python list that the program loops through over and over again.”
“When there is no activity, the program keeps repeating the current step. Everything happens in a large loop in 4.5‑second intervals. Only the ‘door open’ and ‘door close’ buttons can interrupt a loop. Again, the programming gets complex because you can’t always open the door (like when the elevator is moving or between floors), so the code has to keep track of all of that.”
Luckily, it all worked, and Alan looks at the project with a great deal of satisfaction and even deeper admiration for anyone who has coded an elevator. “This simulation was for just one three-floor elevator,” he says. “I can’t imagine the coding required for a bank of elevators in a skyscraper that have to act cooperatively and efficiently.”
Raspberry Pi Official Magazine #154 out NOW!
You can grab the latest issue right now from Tesco, Sainsbury’s, Asda, WHSmith, and other newsagents, including the Raspberry Pi Store in Cambridge. It’s also available from our online store, which ships around the world. And you can get a digital version via our app on Android or iOS.

You can also subscribe to the print version of our magazine. Not only do we deliver worldwide, but people who sign up to the six- or twelve-month print subscription get a FREE Raspberry Pi Pico W!
The post Raspberry Pi does the heavy lifting in this elevator simulator appeared first on Raspberry Pi.
from News - Raspberry Pi https://ift.tt/rqIJ5ZH


No comments:
Post a Comment