USB gadget mode in Raspberry Pi OS: SSH over USB
If you’ve ever tried using a Raspberry Pi — or any single-board computer — while travelling, you probably know how frustrating it can be. Hotel rooms with no spare Ethernet ports, conference Wi-Fi behind captive portals, networks that block local discovery tools, or simply not knowing what IP address your headless board received can all turn a simple task into a hassle.
Last year, I came across a concept that sounded like the ideal solution: Ethernet over USB. The idea is beautifully simple — plug the Raspberry Pi into a laptop and it appears as a USB network adapter, just like when you enable USB tethering on a smartphone. That would mean no Wi-Fi setup, no IP scanning, no captive portal headaches — just plug in, SSH, and start working. Bonus: The host computer could even share its internet connection over that same cable.
At least, that’s the theory.
In reality, getting this to work has traditionally involved a mix of outdated scripts, manual configuration steps, and platform-specific instructions that only reliably supported one host OS at a time — Windows, macOS, or Linux, but rarely all three. Many great community efforts exist, but they often require you to clone repositories, edit system files, or manually switch the Raspberry Pi between Internet Connection Sharing (ICS) and normal local networking — and ICS is typically treated as an optional afterthought, rather than part of a unified workflow.
I wanted to streamline that experience — not to replace community solutions, but to offer a clean, all-in-one option that “just works”, regardless of whether the user is a first-time Raspberry Pi owner or someone deploying a fleet of headless boards.
So I started a project with a clear goal in mind: to make a single Debian package that enables USB gadget networking straight out of the box on all supported Raspberry Pi boards, and across all major host operating systems.
Introducing rpi-usb-gadget
Starting with Raspberry Pi OS Trixie images dated 20.10.2025 and later, a new package called rpi-usb-gadget is included by default. It can be enabled with a single toggle in Raspberry Pi Imager, making USB networking setup drastically simpler.
Once enabled:
- Your Raspberry Pi will present itself as a USB Ethernet device when connected to a PC
- You can SSH directly using the hostname you set in Raspberry Pi Imager — no Wi-Fi or Ethernet setup required
- If your PC has an active internet connection and ICS is enabled, the Raspberry Pi will automatically receive internet access through the same USB cable
- A lightweight background service runs on the Raspberry Pi to detect host connectivity and automatically switch between standalone mode and ICS-backed networking
- In practice, it behaves very similarly to USB tethering on a smartphone — but for Raspberry Pi
The package is supported on all major host systems: Windows, macOS, and Linux.
Important hardware note
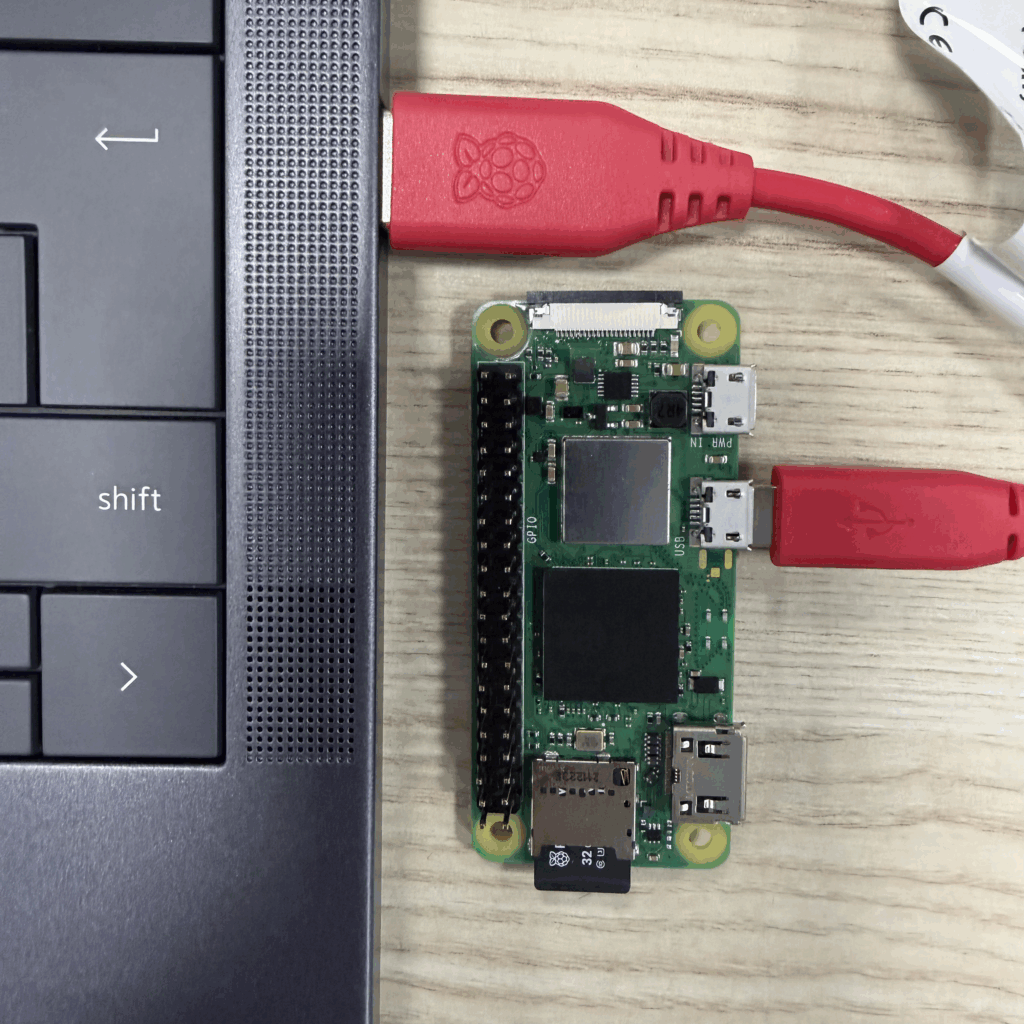
To use USB gadget mode, the Raspberry Pi must be connected to a USB port that supports OTG (device mode):
| Raspberry Pi model | USB port to use |
|---|---|
| Raspberry Pi Zero, Zero W, Zero 2 W | The micro USB port closest to HDMI — not ‘PWR IN’ |
| Raspberry Pi 4, 5, 500, 500+ | The USB-C port directly on the board |
| Compute Module 5 | The USB-C port on the Raspberry Pi CM5 IO Board |
| Compute Module 4 | Requires additional manual setup and is not auto-configured |
⚠ Warning:
Once gadget mode is enabled, the selected port will function exclusively as USB networking + power input; it will no longer operate as a regular USB host port. This means that keyboards, storage devices, or other peripherals cannot be connected to that port while gadget mode is active.
Supported boards:
- Raspberry Pi Zero (W) and Zero 2 W
- Raspberry Pi 3 Model A+
- Raspberry Pi 4 Model B
- Raspberry Pi 5, 500, and 500+
- Compute Module 5
- Compute Module 4 (technically supported, but additional manual setup is required)
For optimal stability — especially on Raspberry Pi 4, 5, and 500/500+ — connect the Raspberry Pi directly to a USB port on your PC. Some laptop USB ports cannot provide sufficient power, which may cause reboots or USB link drops.
Recommended accessory: The Raspberry Pi USB 3 Hub allows you to power the device externally while still passing only data over the USB connection; this is ideal for laptops with weak USB power delivery.
Enabling gadget mode the easy way: Raspberry Pi Imager 2.0
- Generate a capabilities-enhanced manifest
- Double-click the generated os_list_local.rpi-imager-manifest file
- Select a Raspberry Pi OS Trixie image (20.10.2025 or newer)
- In the ‘Customisation’ menu, set a hostname
- This is the name you’ll use to SSH into the Raspberry Pi
- If ICS is disabled on the host, the fallback IP will be
10.12.194.1
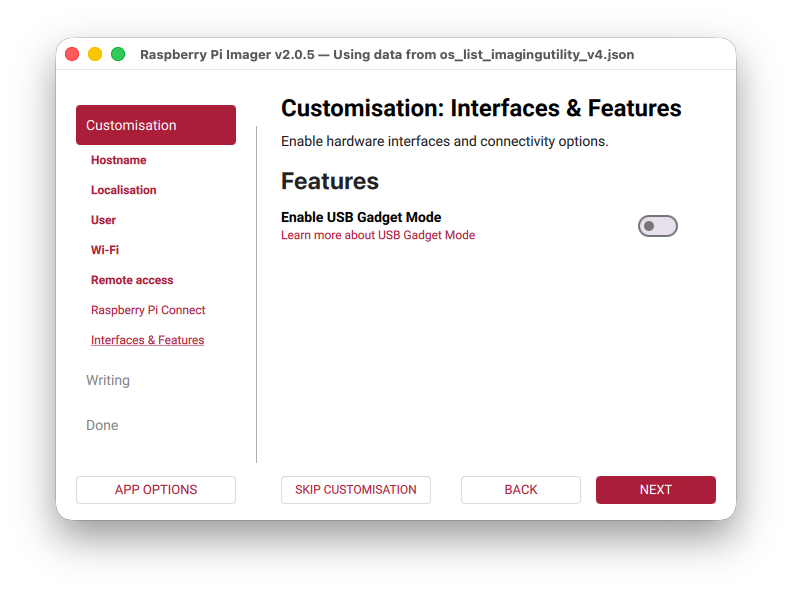
- Go to ‘Interfaces & Features’ and toggle ‘Enable USB Gadget Mode’
- Write the image, insert the card into your Raspberry Pi, and connect it to your PC using the correct USB/OTG port (not just the power input)
- Power on the Raspberry Pi (the first boot may take longer than usual and might reboot once — this is expected)
- Once booted, your Raspberry Pi should appear as a new Ethernet adapter on your host machine
- You can now SSH using the hostname you set
Windows driver requirement
Windows does not include a generic driver for USB Ethernet gadget devices. To avoid relying on impersonated vendor IDs or unofficial drivers, a dedicated installer is provided: download and run rpi-usb-gadget-driver-setup.exe from the project’s releases page on GitHub.
This only needs to be done once per Windows machine.
Internet Connection Sharing (ICS)
If you want your Raspberry Pi to access the internet through the USB connection, enable Internet Connection Sharing (ICS) on your host computer.
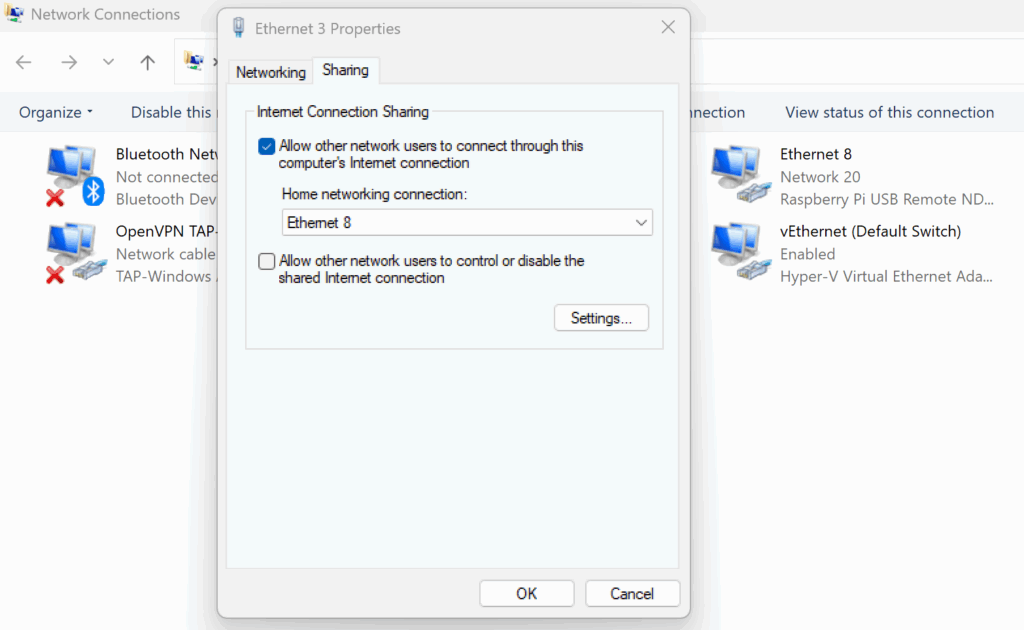
On Windows
- Plug in the Raspberry Pi and confirm it shows up as a new Ethernet adapter
→ It will appear under a name like ‘Ethernet 7 — Raspberry Pi USB Remote NDIS Network Device’ - Open ‘Network Connections’:
→ Control Panel → Network and Internet → Network and Sharing Center → Change adapter settings
→ Or press Win + R and enterncpa.cpl - Identify your primary internet-connected adapter (e.g. Wi-Fi) and open ‘Properties’
- Go to the ‘Sharing’ tab, enable ‘Allow other network users to connect…’, and, in the dropdown, choose the Raspberry Pi USB Ethernet adapter
- Confirm your selection; within around 60 seconds, the Raspberry Pi should obtain an IP address
⚠ Note on Windows ICS behavior:
If ICS is enabled for the Raspberry Pi’s adapter while the Raspberry Pi is not connected, Windows may bind its DHCP service to another interface (such as a Hyper-V adapter). In that case, the Raspberry Pi interface may show as shared but will not receive a DHCP lease. To fix this, fully disable ICS on all adapters you shared the network from, plug in the Raspberry Pi, and then re-enable ICS.
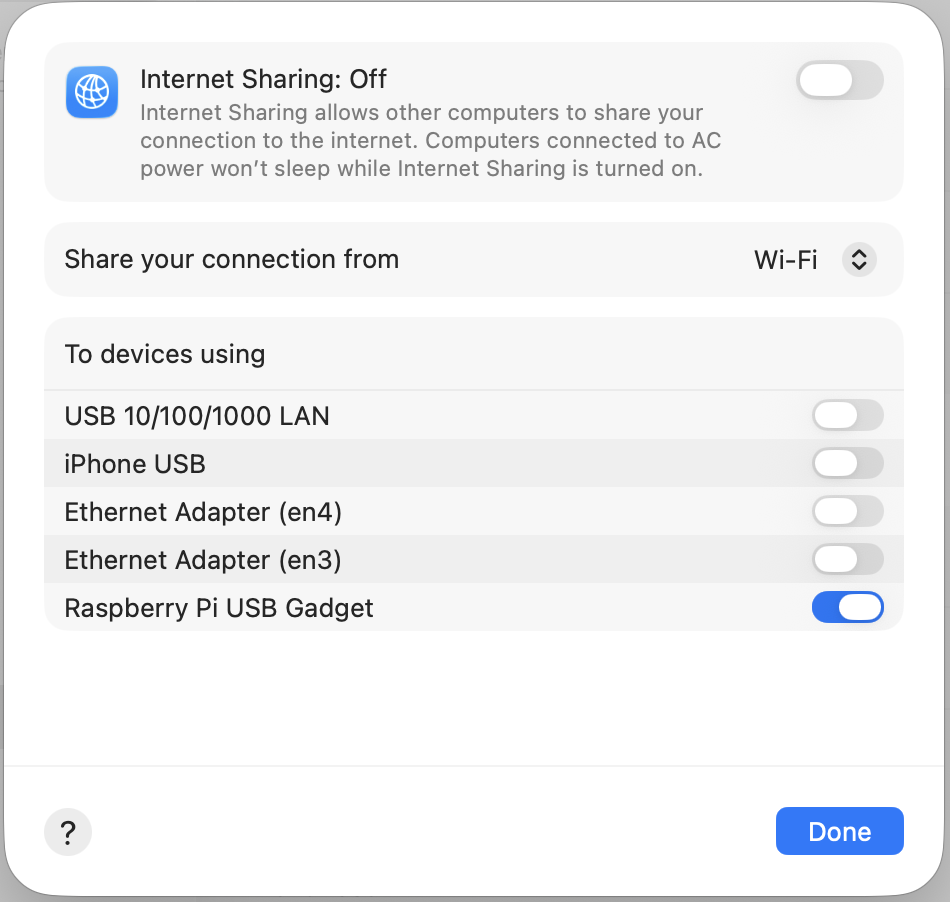
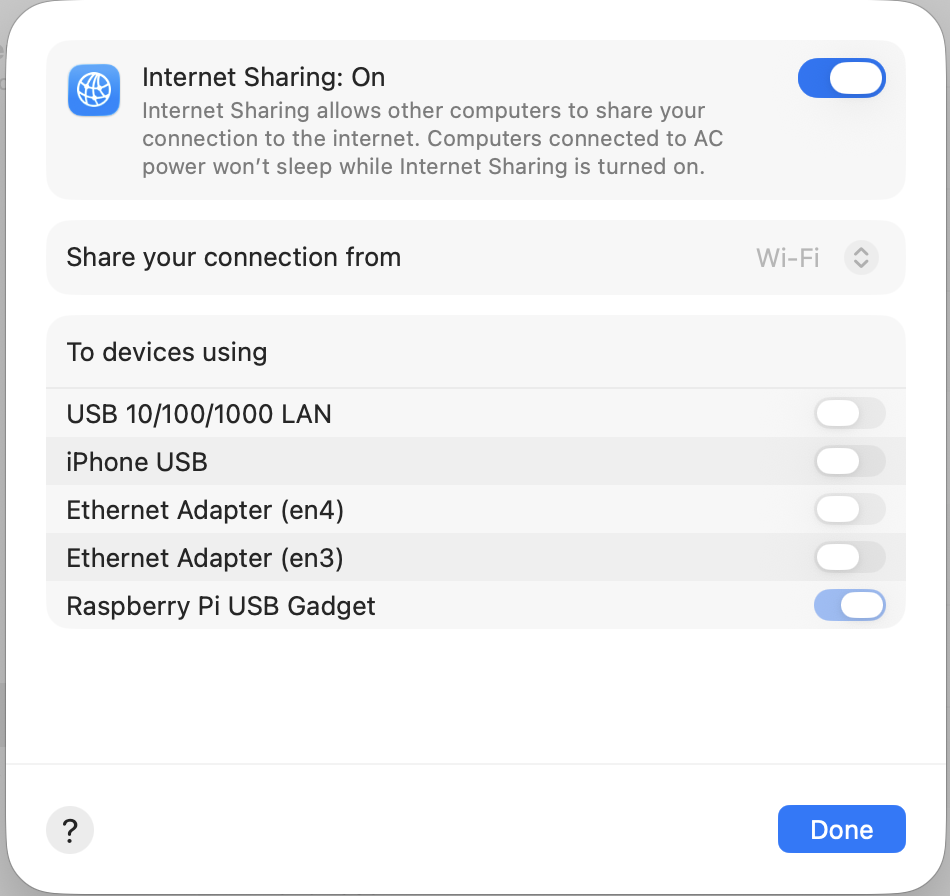
On macOS
- Connect the Raspberry Pi and wait for it to appear as a new USB Ethernet device
- Open System Settings → General → Sharing → Internet Sharing
- Before enabling, click the info icon to configure:
→ Your internet source (e.g. Wi-Fi)
→ The Raspberry Pi USB Gadget interface as the target to share to - Save and toggle ‘Internet Sharing’ on
On Linux
Enable routing and NAT from your primary internet connection to the Raspberry Pi USB Gadget network interface using your distribution’s NetworkManager or equivalent. Instructions vary depending on the desktop environment or init system.
Enabling USB gadget mode without Imager
This only applies to Raspberry Pi OS Trixie–based images.
Fresh images (before first boot):
Cloud-init can enable USB gadget mode automatically on first boot:
- Mount the
bootpartition - Edit
user-dataand append:
rpi:
  enable_usb_gadget: true
enable_ssh: true  # Optional but recommended when using gadget mode
It’s recommended that you also define a user and an SSH key in the same file, as the setup wizard cannot be used over SSH, and connecting USB peripherals is not possible on Zero boards while gadget mode is active.
Existing installation:
1. Verify that you are running Raspberry Pi OS Trixie:
cat /etc/os-release→ Confirm that VERSION_CODENAME=trixie.
2. Install and enable gadget mode:
sudo apt update

sudo apt install rpi-usb-gadget

sudo rpi-usb-gadget on

sudo reboot
After reboot, the USB port will switch into gadget mode. Any active SSH sessions will temporarily drop and then reconnect once the USB Ethernet interface becomes available. Depending on the host system, give it up to one minute for DHCP/ICS negotiation to settle.
Technical details
The rpi-usb-gadget package configures the g_ether USB gadget kernel module, which exposes a virtual Ethernet interface according to the host OS’ capabilities:
- Windows hosts → RNDIS mode
- macOS/Linux hosts → CDC-ECM mode
The correct mode is automatically selected at runtime based on USB descriptor negotiation — no manual selection is required.
Why no USB serial console?
CDC-ACM (serial over USB) is not included, as Windows cannot bind both RNDIS/ECM and ACM to a single composite USB device using one .inf file without vendor-specific drivers.
A lightweight background service runs on the Raspberry Pi and continuously monitors:
- USB link state
- DHCP/ICS availability on the host
- Routing and DNS status
If ICS is detected on the host, gateway and DNS configurations are automatically applied to provide seamless internet access over USB.
Troubleshooting
If the connection doesn’t work immediately, work through the following checks:
Hardware and cabling
- Ensure you are using the correct USB/OTG port:
→ On Zero models, this must be the port labeledUSB, notPWR IN - Connect directly to a USB port on the host PC — avoid hubs or docks that may block OTG negotiation or limit power
- Only connect one Raspberry Pi at a time in gadget mode to avoid host-side interface conflicts
- If the Raspberry Pi reboots repeatedly or disconnects, it may not be receiving enough power
→ Use a powered USB hub or the Raspberry Pi USB 3 Hub to supply external power while keeping data routed through the host
ICS and DHCP behavior
- After enabling ICS, wait up to one minute for DHCP to issue an IP, and for hostname resolution to begin working
- On Windows, if the gadget adapter shows as ‘Shared’ but no IP is assigned:
→ Disable ICS completely on all interfaces, plug in the Raspberry Pi, then re-enable ICS and reassign the correct adapter - Windows may list multiple ‘Ethernet X’ adapters from previous attempts
→ Consider removing or disabling unused adapters to prevent routing conflicts
Hostname and mDNS
- If
ssh pi@hostname.localdoes not resolve on Windows, install Bonjour/mDNS support or use the assigned IP address directly (shown inarp -a)
Source code and driver downloads
This feature is now included by default in Raspberry Pi OS Trixie images, but all code and tooling remain open for inspection and contribution. You can find the full source, the documentation, and the Windows driver installer (rpi-usb-gadget-driver-setup.exe) here.
The repository also contains an issue tracker, as well as reports from real-world setups — particularly involving ICS on Windows and macOS — which are extremely valuable. Different host systems behave slightly differently when assigning DHCP, routing, or firewall rules, so community feedback helps make the experience more reliable for everyone.
Wrapping up
USB gadget mode brings a Raspberry Pi much closer to being a plug-and-go development device — no Wi-Fi setup, no IP scanning, no HDMI, and no keyboard required. Just connect a single USB cable, SSH in, and start building.
This feature has been designed to be simple enough for beginners to use, yet robust and scriptable enough for power users and large-scale deployments. Future updates will continue to refine host detection, ICS handling, and diagnostics. If you have ideas or edge cases to share, the GitHub issue tracker and the Raspberry Pi Forums are open.
The post USB gadget mode in Raspberry Pi OS: SSH over USB appeared first on Raspberry Pi.
from News - Raspberry Pi https://ift.tt/Wg0sAax
Labels: News - Raspberry Pi, IFTTT

0 Comments:
Post a Comment
Subscribe to Post Comments [Atom]
<< Home