Raspberry Pi Pico projects
To inspire you this #MakerMonday, we’re showcasing just a few of the best Raspberry Pi Pico projects around — from information dashboards, IoT sensors, and LED lighting to robots, drones, musical instruments, and wearables.
If you need a tiny, low-cost microcontroller board with ultra-low power drain to embed in a project, Raspberry Pi Pico is ideal. It comes in several flavours, depending on how much processing power you need and whether you require wireless connectivity. All models feature a couple of bonus features: analogue inputs and PIO (programmable input/output) state machines that can handle some tasks in the background.
Information dashboard
Fetch online data and show it on a display
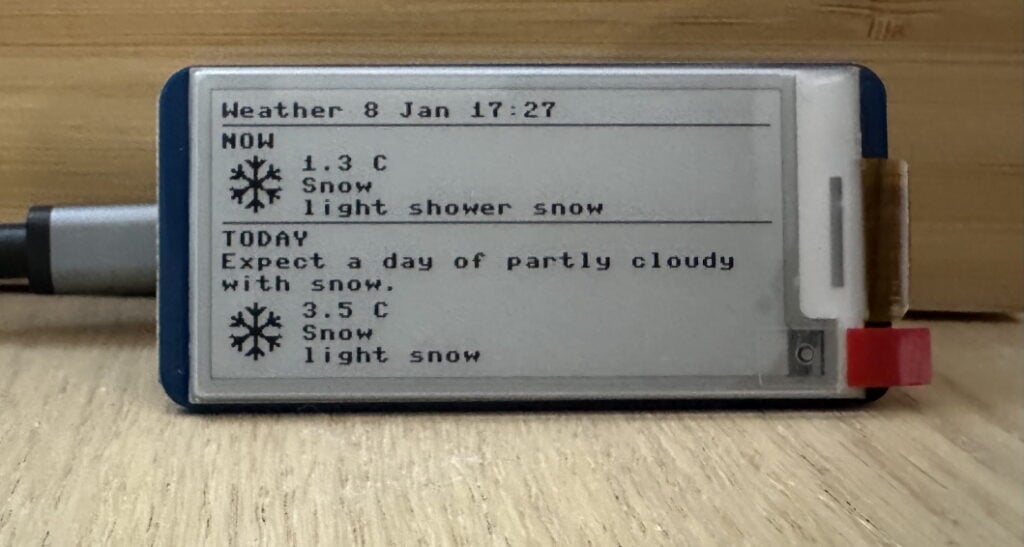
With its wireless connectivity, Raspberry Pi Pico W (or 2 W) can retrieve information from the World Wide Web, such as the current weather conditions. A weather dashboard is a popular Pico project, and Pete Cornish’s simple example is easy to replicate. All you need is a Pico W and a small screen to show the info — he’s used a Waveshare 2.13-inch e-ink display.
To connect Pico W to the web, you’ll need to add your wireless router’s name and password to a config file. In this example, the latter also contains the latitude and longitude of set a location for local weather info. To fetch data, you’ll usually need to obtain a key for the API of whatever online database you’re using — in this case, OpenWeatherMap.
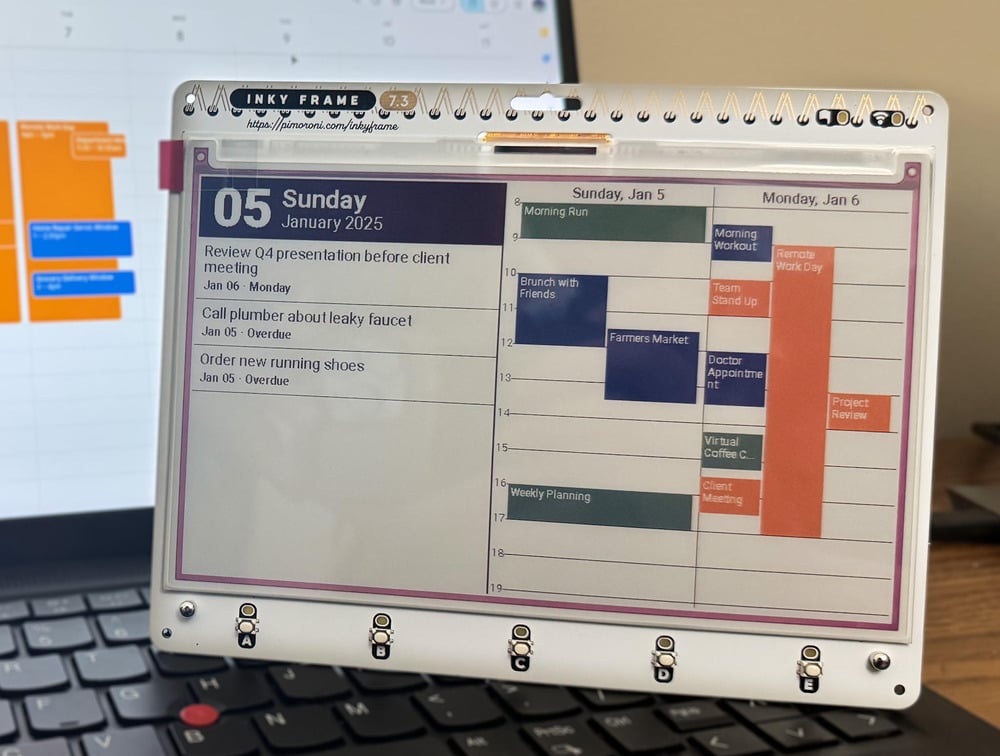
As showcased in issue 152 of Raspberry Pi Official Magazine, Jaeheon Shim’s Inky Dashboard features a calendar and a to-do list. It runs on a Raspberry Pi Pico–powered 7.3-inch Inky Frame colour e-ink display. Since the calendar layout uses the LVGL graphics library, modifying the code to work with other e-ink displays shouldn’t be too difficult.
Calendar data is fetched from iCal, but it can work with other services such as Google Calendar or Microsoft Outlook. Since Pico W can’t handle this directly, it fetches data via a server running on a computer or hosted in the cloud. As Pico W only fetches data every 30 minutes or so, going into a deep sleep in between, it’s a very power-efficient project.
IoT sensor
Use Pico as an IoT device for sensor data
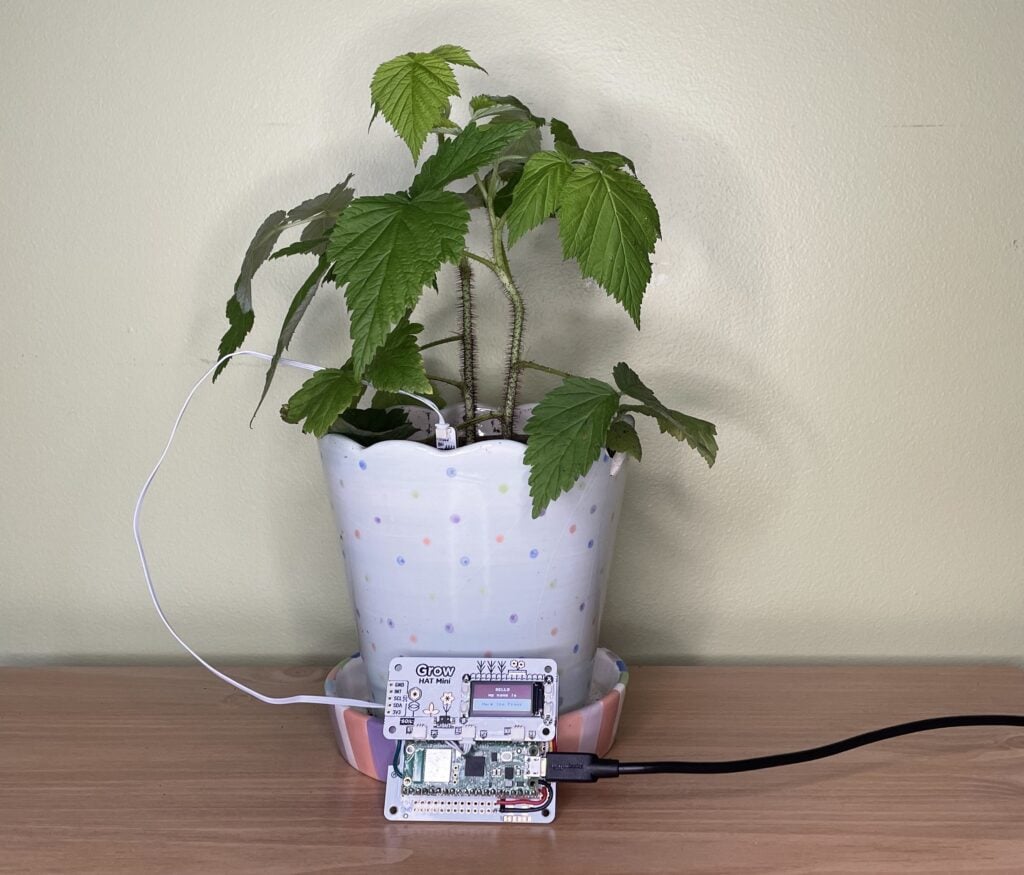
Sandeep Mistry’s project combines a Raspberry Pi Pico W with a Pimoroni Grow Kit to monitor the moisture level of soil. If it’s too dry, a text notification is sent — using the Twilio API with a free account — to the owner’s phone to remind them to water it. For some extra personality, Sandeep suggests adding random messages, along with a light sensor to detect sunrise/sunset and say ‘good morning/night’ accordingly.
Alternatively, you could set up a Pico-based self-watering system like the one created by Veeb. If its sensor detects dry soil, it triggers a relay switch to activate a fish-tank water pump to squirt some much-needed H2O into the pot.
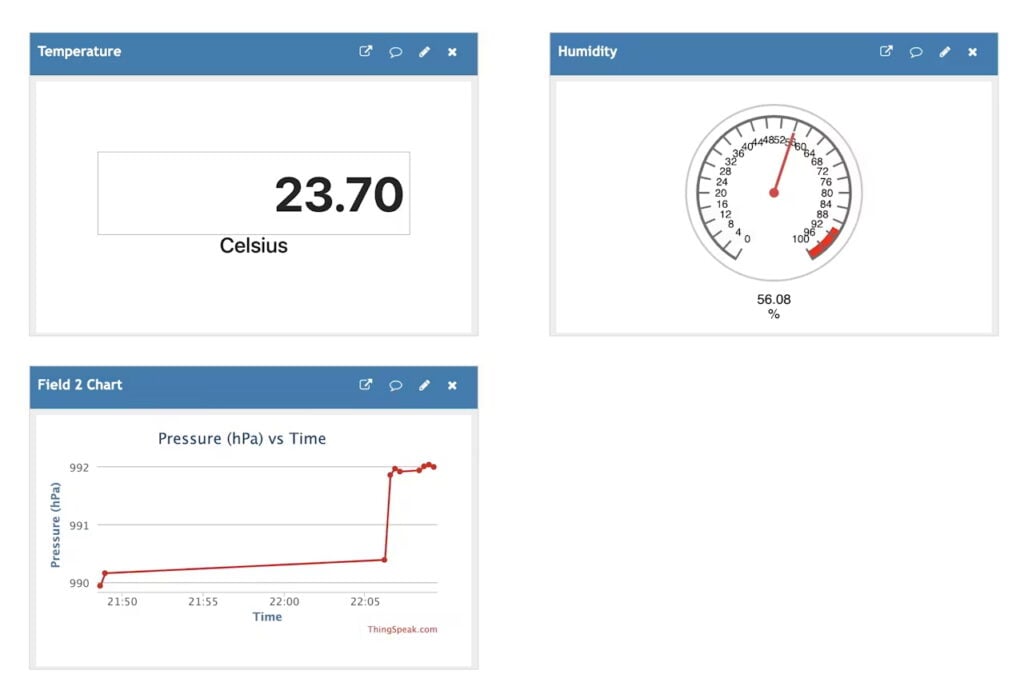
With one or more sensors connected to a Raspberry Pi Pico W, you can monitor the local environment for aspects such as temperature, atmospheric pressure, and humidity. The data collected can then be used however you want — in this project by Mahmood M Shilleh, it’s sent to an IoT dashboard in the cloud that can be accessed from any device.
There are numerous services and methods that can be used for this; Mahmood opted for ThingSpeak, a popular open source IoT platform. In his guide, he shows how to set up a Pico W to send data from a BME280 sensor to ThingSpeak by generating an API key and creating channels for the data feeds to show them on a web dashboard.
Robots and drones
Make mechanical marvels with Pico
Pico’s tiny footprint means it can be used in much smaller robots than a standard Raspberry Pi computer. To prove the point, RoboticBits even made one with a cut-down Pico board equipped with beads for wheels.
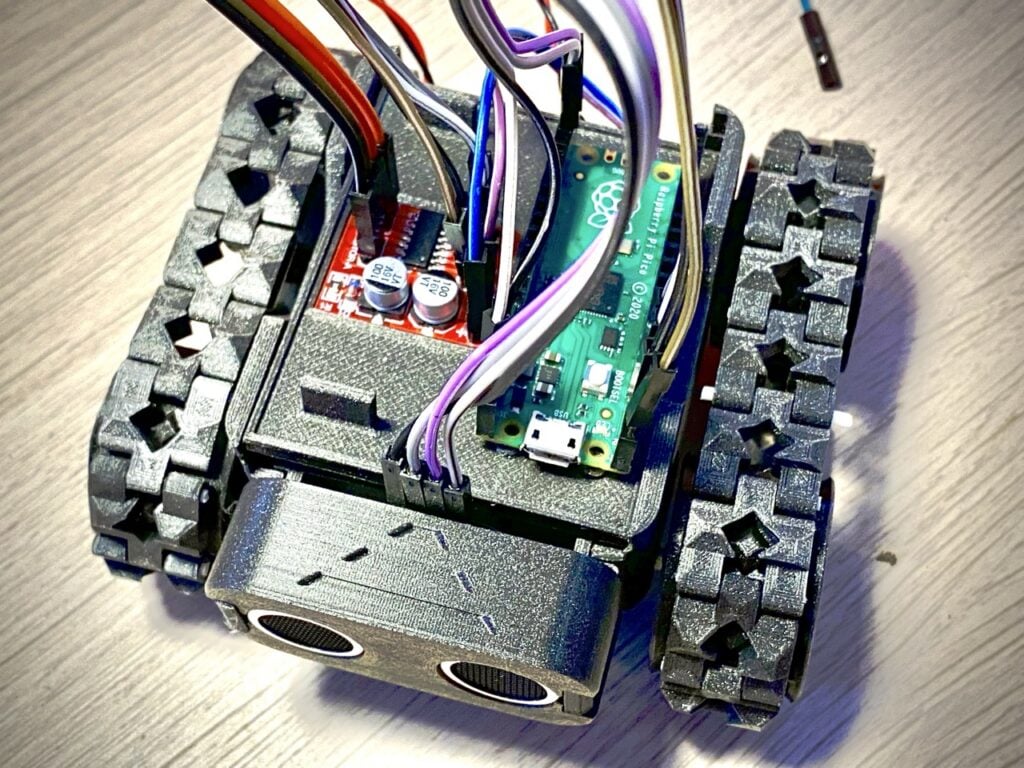
They don’t have to be small, however. Kevin McAleer’s PicoSMARS robot is a more standard-sized robot car with a Raspberry Pi Pico for a brain. ‘SMARS’ is short for ‘Screwless Modular Assemblable Robotic System’, a 3D-printable robot that’s modular and customisable. Pico is connected to a motor board to drive the motors, as well as an ultrasonic distance sensor to detect obstacles. Code and STL files for 3D printing can be found via this link.

Again, Pico’s small size and weight (4g without pin headers attached) make it perfect for use in drones. Created by Tim Hanewich, this impressive quadcopter drone uses a Pico as a flight controller, reading telemetry from an MPU-6050 accelerometer and gyroscope, interpreting radio commands from an on-board receiver, and controlling four independent motors through an electronic speed controller (ESC) using pulse-width modulation (PWM).
The project may look a little daunting to recreate, but Tim has written a free and open source twelve-part guide to the build process, including MicroPython coding and testing, to help you achieve stable flight.
Model railway
Choo-choose Pico to stay on track

Raspberry Pi boards have been integrated into many hobbyists’ model railway setups to enable features such as smart, controllable lighting. This project features a ‘sensored track’ equipped with IR proximity sensors that detect a train passing. Raspberry Pi Pico acts as the brains, reading the sensors and controlling the track voltage — via a motor driver board — to alter the speed of a locomotive using pulse-width modulation (PWM). In this way, it can make it speed up, slow down, or come to a halt.

By connecting Raspberry Pi Pico to a set of tiny level crossing lights for a model railway, this project by Pater Practicus (aka Brendan McGrath) detects passing trains and determines when it’s safe for the model cars or pedestrians to cross. As such, it combines two of Pico’s popular uses: the ability to control LED lighting and take readings from a sensor.
It’s been upgraded from the original work-in-progress version on a wooden track to a more polished setup for a powered railroad, yet still only costs £23 ($32) to make. The build process, including wiring, MicroPython coding, and making the flashing signs, is covered in the linked YouTube video.
Gaming
Pico is ideal for a handheld console
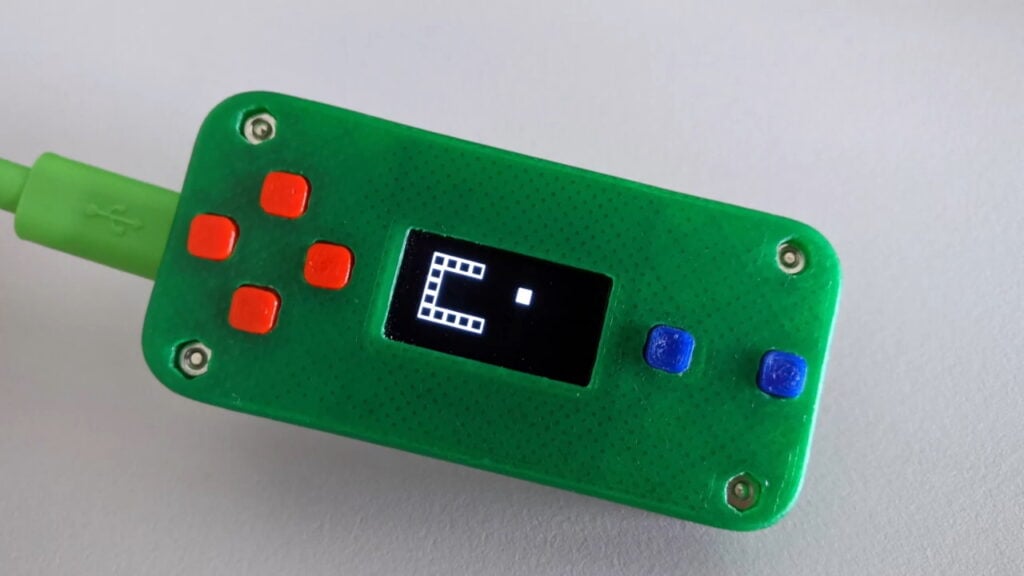
Maker Twan37 took only a few days to make this Raspberry Pi Pico game console. It’s more of a proof-of-concept and lacks a built-in battery, but is impressive nonetheless and shows what kind of handheld you can easily make with Pico. Housed in a 3D-printed case, Pico is connected to a monochrome 0.96-inch I2C OLED display and a few push-buttons for controls, four of them comprising a makeshift D-pad.
In order to demonstrate the compact console working, the maker created a couple of simple games in MicroPython — clones of Snake and Tetris — along with a maze generator.
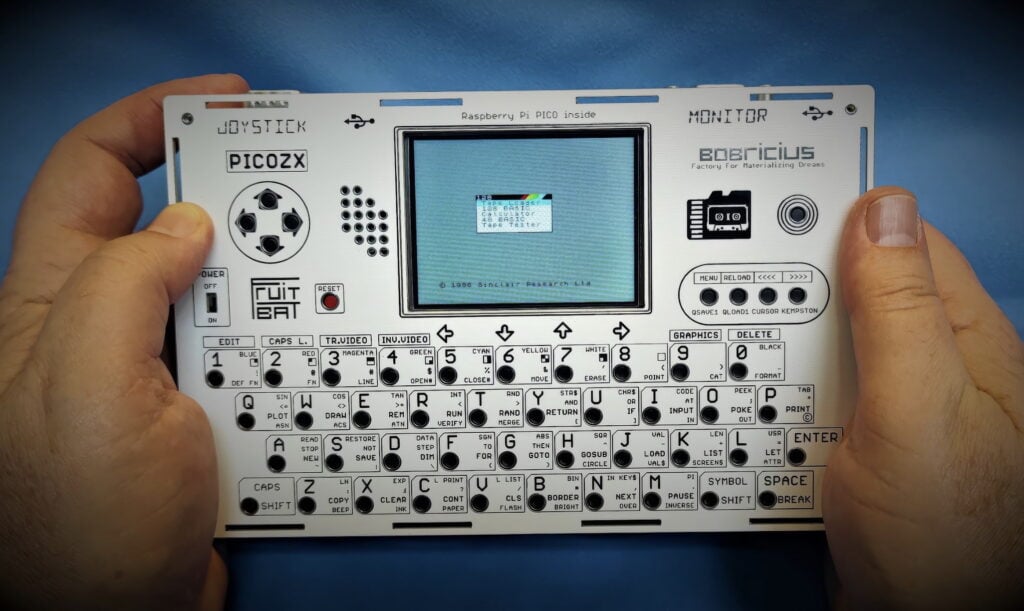
An altogether more sophisticated gaming project, this Sinclair ZX Spectrum–emulating handheld console is based around several custom PCBs, with a Raspberry Pi Pico soldered to the main board. Inspired by Peter Misenko’s original PicoZX Spectrum emulator, maker Ken St Cyr (from the YouTube channel What’s Ken Making) even created a miniature QWERTY keyboard that sits below a 2.8-inch colour IPS display. There’s also an on-board D-pad, though it can be used with a separate joystick as well. Ken’s YouTube video documents the whole build process if you fancy having a go.
Music
Make beautiful music with Pico

While Pico doesn’t have an on-board audio output, it can be very useful for music projects. Showcased in issue 123 of Raspberry Pi Official Magazine, this one is a compact eight-step MIDI sequencer with eight lever switches (equipped with status LEDs), a mini I2C OLED screen, a rotary encoder, and a Raspberry Pi Pico in a 3D-printed case.
Maker Tod Kurt says it’s designed as a potential DIY kit for people with beginner-level soldering skills — except for the two MIDI ports, all of the parts are of the through-hole type. All the details and code can be found in the GitHub repo.
Another MIDI project using Raspberry Pi Pico is GaryRigg’s musical expression pedal for a guitar (or other instrument), which rotates and rolls around a ball joint, its position being read by a six-axis AHRS IMU sensor. Unlike a standard pedal, this enables it to control three parameters at once using yaw, pitch, and roll, meaning far more musical effect variations can be produced. It can also operate as a hand controller, so could be used by DJs or in a studio. For more details, see the showcase in issue 149 of Raspberry Pi Official Magazine.
Input device
Build a Pico-based controller
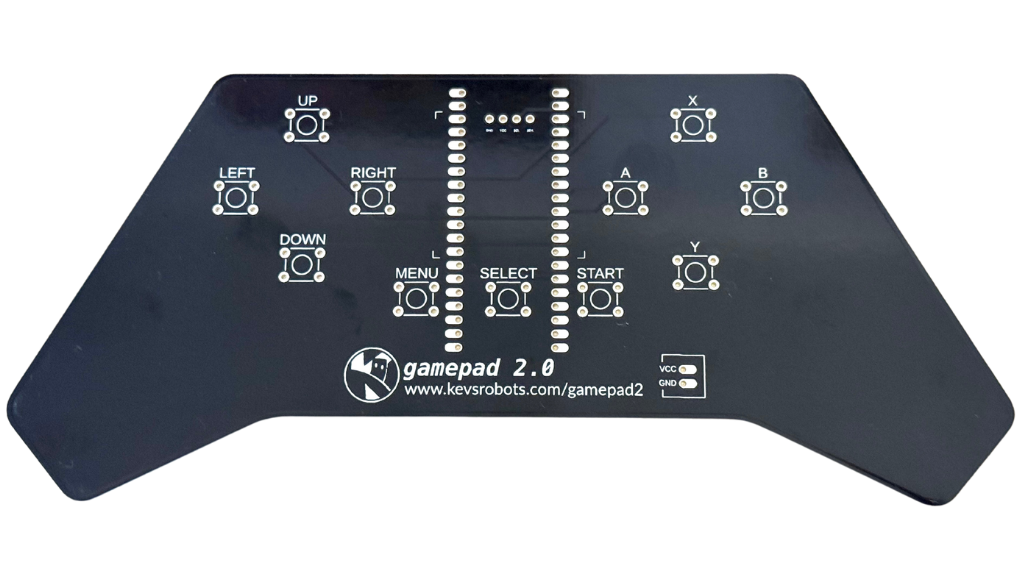
Microcontrollers like Pico are ideal for powering a gamepad or other control device. You could try building your own from scratch, but this kit from Kevin McAleer makes it a lot easier and is ideal for controlling robots via Bluetooth or Wi-Fi.
The custom PCB enables you to simply solder a Raspberry Pi Pico W or 2 W onto it, along with eleven tactile switches for two D-pads and three UI buttons. There are also connections for a LiPo battery and an optional mini OLED display. A MicroPython library makes programming easy.
An alternative kit is the Alpakka 1, which is based around an RP2040-powered module.

A macro pad can be a very useful addition to a computer setup, enabling you to easily trigger custom keyboard shortcuts and sequences with the press of a single key.
There are some RP2040/Pico-based macro pad kits available from the likes of Pimoroni and Adafruit. Or you can build your own, like this nine-key example made using a Raspberry Pi Pico, an Arduino Nano R3, some Gateron switches, and a few keycaps. Programmed in CircuitPython, it enables you to record macros to trigger with each key.
Alternatively, you can even build a full keyboard powered by Pico, such as with the pi40 kit.
Wearables
Pico projects you can wear

Pico’s small size and low power drain make it ideal for wearable projects, such as adding LED lighting to cosplay outfits — or hats, like the famous Raspberry Pi Beret. It’s also been used for interactive conference badges, including Pimoroni’s Badgerware range.
Kevin McAleer, on the other hand, opted to bling up some specs for his hackable Cyber Glasses. A Raspberry Pi Pico is mounted onto one arm of the 3D-printed glasses, along with a servo that moves a monocle-like NeoPixel ring in front of the wearer’s right eye.
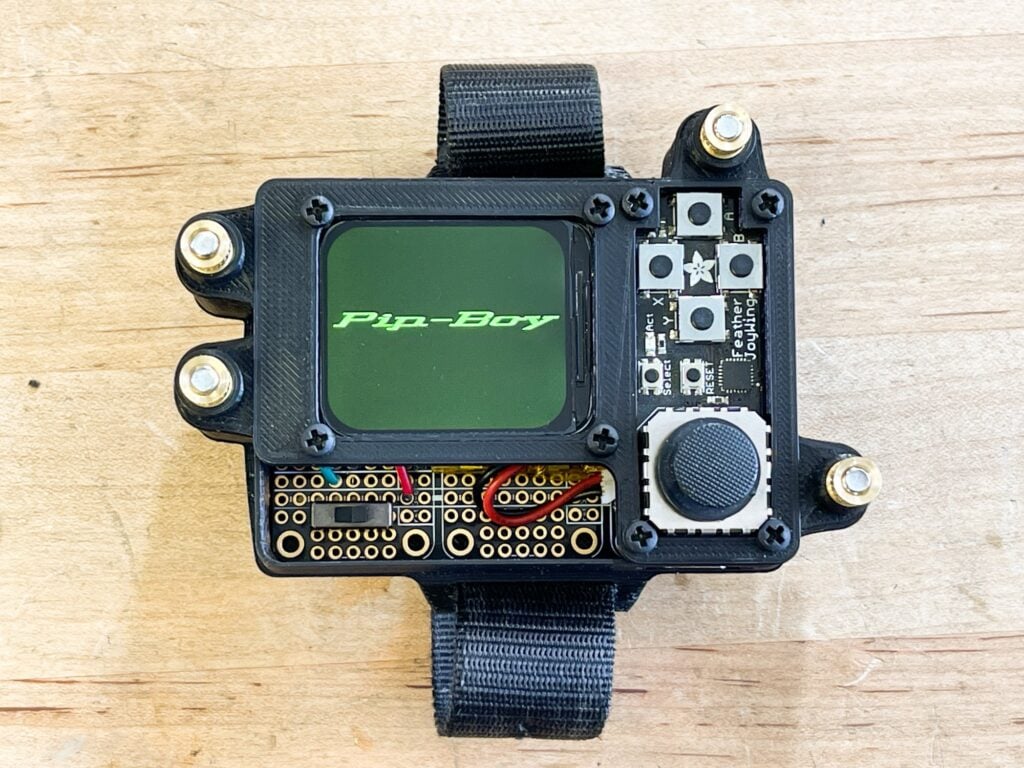
Along with the official Raspberry Pi Pico product line, there are numerous third-party boards that make use of the same RP2040 and RP2350 chips. This project from Adafruit uses the firm’s Feather 2040 board, for example. Inspired by the game Fallout, it’s a wrist-mounted prop ready for the apocalypse. It features a rounded rectangular IPS TFT display in a 3D-printed case.
Using the demo software written in CircuitPython, you can switch between graphic screens using the directional buttons, and move the cursor with the mini joystick. With a bit of imagination, you could easily create more interactive programs for it.
LED lighting
Shine a light with some LEDs

Strings or strips of individually addressable LEDs are perfect for creating all sorts of funky multicoloured effects. Our LED lighting expert Ben Everard recently put together a two-part guide on controlling Christmas lights with Pico, starting in issue 159 of Raspberry Pi Official Magazine. It’s easy to connect a NeoPixel (aka WS2812B) strip with just three wires: power, ground, and data-in. If you have a whole lot of NeoPixels (more than around 30), though, you may need to inject some extra power into the circuit to light them all up at full brightness.

Adding LED lighting to a staircase has long been a popular lighting project for Raspberry Pi devices. Craig Robertson’s version makes use of a Raspberry Pi Pico and a 30-pixel NeoPixel strip. A passive infrared sensor (PIR) detects a person approaching and lights the way for them. He also added a light-dependent resistor (LDR) to monitor the ambient light level so that the lights are only triggered when it’s dark, not in daylight. He programmed Pico to light the LEDs in sequence, fading them from a colour to white.
The post Raspberry Pi Pico projects appeared first on Raspberry Pi.
from News - Raspberry Pi https://ift.tt/IhGfq5R
Labels: News - Raspberry Pi, IFTTT

0 Comments:
Post a Comment
Subscribe to Post Comments [Atom]
<< Home